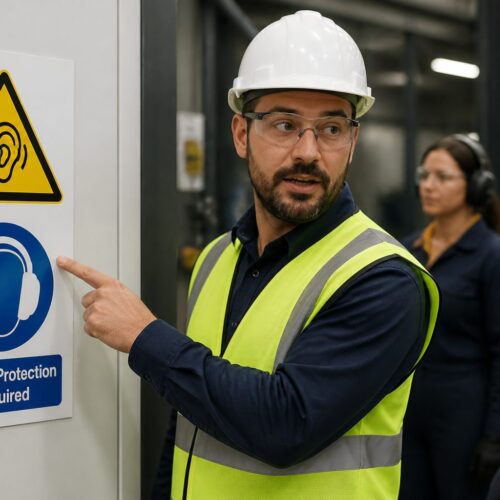
Safety pictograms look simple on the wall, but the work behind them is picky and technical. If you get one wrong, people do not just misunderstand, they do the wrong thing fast.
Creating custom safety pictograms is sometimes the only way to communicate a site specific hazard, a new process, or a weird piece of equipment. The catch is that a custom symbol can easily turn into a private code that only insiders understand.
This article walks through a practical process that keeps your symbols plain, readable, and consistent with international sign habits. The goal is a symbol people grasp in a glance, even when they are tired, rushed, or working in a second language.
When custom pictograms are appropriate (and when they aren’t)
Custom pictograms make sense when a standard ISO or ANSI symbol does not exist for the exact message you need. They also make sense when the standard symbol exists but clashes with local equipment, site layout, or a regulated procedure that has to be shown more specifically.
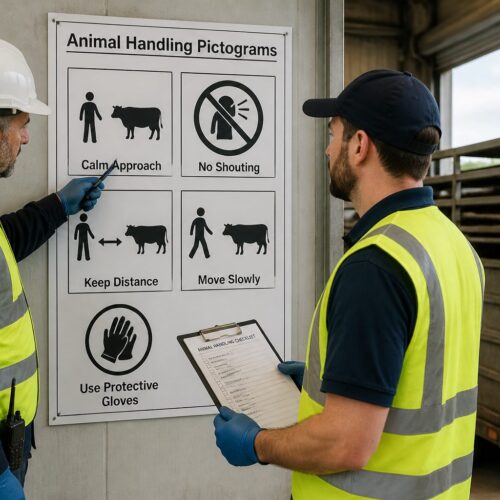
A common trigger is a hazard that is real but not common enough to have a widely recognized icon, like a specialized radiation source inside a testing cabinet or a robot cell with a unique pinch point. Another trigger is a new workflow where the hazard is created by the sequence, not by a single machine.
Custom symbols also help when your workforce is multilingual and the text part of a sign is doing too much heavy lifting. A clean pictogram can reduce translation issues, as long as you do not replace clarity with cleverness.
They are especially useful for internal logistics messages that are safety adjacent, like “return empty drums here” or “keep aisle clear for emergency egress.” Those messages are not always covered by safety sign standards, but they still affect risk.
I avoid custom symbols when the real issue is poor placement, bad lighting, or too much text on the sign. Fixing those problems usually improves comprehension more than inventing new graphics.
If a sign is mounted behind a door swing, hidden by stacked pallets, or aimed away from the approach path, a perfect icon will still fail. In audits, I often find “symbol problems” that are really visibility problems.
Another trap is using custom pictograms to patch over training gaps, because the symbol becomes a substitute for instruction. A pictogram can remind someone, but it cannot teach a complex procedure from scratch.
Another good use case is a temporary condition, like a short term detour inside a warehouse or a seasonal chemical storage change. In those cases you can create a pictogram, deploy it with a clear end date, then retire it before it becomes clutter in the system.
Temporary symbols also work for construction phases, where the hazard is real but the layout changes weekly. If you treat the icon as a controlled temporary control, you can keep it from turning into permanent noise.
Even for temporary use, the symbol should still follow your sign system rules, because people do not switch reading modes based on your project schedule. A temporary sign that looks unofficial can get ignored faster than you expect.
Custom work is a bad idea when you can get 90 percent of the way there with a recognized symbol plus a short qualifier line. People already know what the base symbol means, and you should take that advantage whenever you can.
For example, a standard “wear hearing protection” symbol plus a qualifier like “during air blowdown” is often better than inventing a new icon that tries to show a compressor, a hose, and ear muffs all at once. The standard symbol carries the action, and the text carries the condition.
I also avoid custom pictograms when the message is really a policy choice, like “no personal phones,” because those tend to change and create enforcement debates. If you must post them, keep them clearly in the policy category so they do not dilute safety critical warnings.
Finally, do not go custom just because a manager wants a sign that feels unique or branded. A safety pictogram is not a logo, and novelty is usually the enemy of fast comprehension.
Define the message: action, hazard, or location
Before any sketching, decide whether the pictogram communicates an action, a hazard, or a location. This one choice controls the whole layout, because action symbols usually show a person doing something, while hazards often show the source of danger.
If you skip this step, you often end up with a hybrid symbol that feels busy and still does not tell the viewer what to do. A good pictogram is opinionated about what the first takeaway should be.
Action messages include things like “wear face shield” or “lock out power before servicing.” Hazard messages include “crush zone” near a compactor or “corrosive spill risk” near a transfer pump.
With action symbols, the viewer should be able to answer, “What am I supposed to do right now?” without reading supporting text. With hazard symbols, the viewer should be able to answer, “What can hurt me here?” before they step closer.
Location messages are often overlooked, but they matter for logistics and emergency response. Examples include “spill kit here,” “AED location,” “battery charging area,” or “quarantine pallet zone” in a distribution center.
Location symbols should prioritize wayfinding clarity over drama, because the user is often scanning while moving. If the icon does not pop quickly, people will keep walking and miss the resource they need.
Once you pick the message type, decide whether the symbol is prescriptive or descriptive. “Wear gloves” is prescriptive, while “hot surface” is descriptive, and mixing those tones can confuse the response.
Write a one line intent statement that you can read out loud without extra context. If you cannot say it plainly, the pictogram will probably end up overloaded with tiny details that fail at distance.
I like intent statements that start with a verb for actions, a noun phrase for hazards, and a “here” phrase for locations. That small discipline prevents you from accidentally designing a location icon for an action problem.
Also define the likely wrong interpretation, because that is what you are designing against. If the worst mistake is confusing “do not enter” with “keep clear,” then your symbol needs stronger barrier cues than you might think.
Be specific about who the viewer is, because a pictogram that works for maintenance may not work for visitors. If the sign will be seen by contractors, delivery drivers, or the public, assume less shared context and fewer insider terms.
Finally, decide whether the symbol needs to be understood without any supporting text at all. If the sign might be used on a small label, a floor marking, or a tag, the pictogram has to carry the message on its own.
Sketching and refining: from rough icon to final form
Start with ugly sketches on paper, because the fastest way to find the idea is to draw five bad versions. I try to get to at least twenty thumbnails before I pick a direction, since the first concept is usually the most obvious and the least clear.
In the thumbnail phase, you are not drawing art, you are testing metaphors. You are asking whether the message reads as a silhouette, not whether the curves look nice.
It helps to sketch at the size the symbol will actually be printed, because scale changes what details survive. A symbol that looks fine on a monitor can collapse into mush on a 2 inch sticker.
I also sketch the symbol inside the intended sign shape, because the container affects composition. A triangle, circle, and square each push the eye differently and can make the same icon feel cramped or balanced.
Refinement is where symbol development becomes real work, because you have to delete almost everything you want to include. If the meaning depends on a tiny hand position, a small label, or a complicated tool shape, you need a simpler metaphor.
Deletion is not just removing details, it is choosing which detail carries the message and making that one detail dominant. If the viewer has to inspect the symbol to find the important part, you have already lost.
When a concept keeps failing, I switch to a different representation strategy, like object-only, person-plus-object, or environment-only. Sometimes the simplest answer is to stop drawing the machine and draw the consequence, like a hand near a blade with a clear separation cue.
Be careful with perspective, because three-quarter views can look realistic but reduce recognition speed. Flat side views and simple front views tend to read faster, especially for tools and containers.
Human figures deserve extra attention, because they carry implied motion and intent. A figure that looks like it is reaching can be read as “do this” even when you meant “do not do this.”
Negative space is a tool, not an accident, and it can clarify a shape without adding lines. A clean gap between a hand and a hazard can communicate “keep away” better than a tiny prohibition slash.
During refinement I constantly test the icon in black and white, because color is not guaranteed in the real world. If the symbol only works when it is red, it is fragile.
I also test quick distortions like blur, low resolution export, and simulated dirt, because signage lives a hard life. If the icon depends on thin strokes or small holes, it will degrade into ambiguity.
| Refinement check | What to look for | Practical fix |
|---|---|---|
| Silhouette readability | Recognizable at 10 to 20 feet | Thicken shapes, remove interior lines |
| Single focal point | Eye lands on the main message first | Increase contrast, reduce secondary objects |
| Detail dependency | Meaning fails if a small detail is missed | Swap detail for a simpler object or gesture |
| Context independence | Works without knowing the local process | Add universal cues like arrows, barriers, PPE |
| Reproduction tolerance | Survives low resolution printing and wear | Avoid thin gaps, avoid fine textures |
After you pass these checks, do a “mirror test” by flipping the icon horizontally and seeing if it still reads. If flipping breaks the meaning, you may be relying on a directional cue you did not intend.
Then do a “one second test” where you glance at the icon and look away, and only write what you remember. What people remember is usually what they actually perceived.
At the end, build the final in vector and lock in consistent geometry, because wobbly hand-drawn lines look unprofessional and inconsistent. Clean geometry also makes it easier to scale, cut vinyl, or engrave plates without surprises.
Do not be afraid to throw away a near-finished icon if it keeps producing mixed interpretations. The sunk cost is real, but the cost of a confusing safety symbol is worse.
Aligning with existing sign conventions for faster understanding
People read safety signs by pattern, not by art critique, so your custom icon should borrow the grammar of common systems. That means using the same viewing angles, the same human figure style, and the same arrow logic people already see on ISO 7010 style signs.
Borrowing grammar does not mean copying a specific symbol, it means matching the visual language people already trust. When the symbol feels like it belongs, the brain spends less time deciding whether it is important.
Color and shape carry meaning before the pictogram even registers. If your site uses a yellow triangle for warnings and a blue circle for mandatory actions, do not improvise, because you will slow people down.
Also consider how your signs look under different lighting, because color perception changes in sodium vapor, LED glare, and low light. A yellow that looks fine in an office can look brown in a warehouse aisle.
Consistency also matters inside the pictogram itself, especially with line weight and corner radius. When one symbol uses a stick figure with round joints and another uses sharp elbows, users subconsciously treat them as different systems.
That subconscious split is costly because it makes people pause, and pauses are where errors sneak in. A coherent set of symbols trains the eye over time, even if no one can explain the rules out loud.
Pay attention to arrow conventions, because arrows are not universal in the way people assume. A curved arrow can mean “rotate,” “move around,” or “circulate,” so you need to match the arrow style to the action you intend.
Prohibition marks also have rules, and the red circle slash is only clear when it cleanly crosses the prohibited object. If the slash hits empty space or grazes the edge, the symbol reads as decoration.
Sign system consistency is also about placement rules, like mounting height, approach angle, and whether the symbol sits left of text or above it. If your custom signs break those habits, the symbols can be correct but still get missed.
Placement also includes the decision to mount at the point of decision rather than the point of hazard. A warning that appears after the user has already committed to a path is basically a record of failure.
Match your typography rules too, because text and pictograms share the same visual field. If the font is inconsistent, users may treat the entire sign as unofficial or temporary.
When you build a custom icon, check it against your existing library side by side, not one at a time. The goal is that the new symbol looks like it always existed, not like a special project.
Finally, keep cultural interpretation in mind, especially with hand gestures and body posture. A gesture that means “stop” in one place can be read as “go ahead” somewhere else, so lean on objects and barriers more than gestures.
Validating with quick comprehension tests
Pictogram testing does not need a lab, but it does need honesty about what counts as success. If people guess the right answer after you give them hints, the symbol failed in the field conditions that matter.
The point of testing is not to prove you were right, it is to find the fastest path to fewer wrong interpretations. A symbol that produces the same wrong guess repeatedly is giving you useful information.
A quick method is a timed comprehension check, where you show the symbol for three seconds and ask the person to write what it means. Another method is a multiple choice test with plausible wrong answers that mirror real mistakes, like confusing “eye wash” with “drinking water.”
Timed tests are important because they simulate real scanning behavior, where people do not stop and study a sign. If the symbol needs ten seconds, it is not a pictogram, it is an illustration.
Multiple choice tests are useful when you want to measure confusion between close categories, like “mandatory PPE” versus “recommended PPE.” The wrong options should be credible, because silly options inflate your pass rate.
When you run tests, include people who are new to the area, because familiarity hides problems. Veterans can decode almost anything because they already know the story behind the hazard.
Also include at least a few people who will see the sign under stress, like forklift operators, maintenance techs on call, or line leads during changeovers. Stress changes attention, and attention is what pictograms compete for.
Ask participants what they think they should do after seeing the symbol, not just what it “means.” A symbol that is interpreted correctly but does not trigger the right action is still a failure.
Record hesitation as well as wrong answers, because hesitation is a leading indicator of future mistakes. If people pause and then answer correctly, they may not pause in real life.
- Recruit 10 to 20 mixed role participants
- Show symbol for 3 seconds, then hide it
- Collect first interpretation in plain words
- Record wrong answers and hesitation points
- Retest after one redesign cycle
- Set a pass threshold before you start
Set your pass threshold based on risk, not ego, because a low-risk housekeeping sign can tolerate more confusion than an emergency shutdown sign. For high consequence messages, you want a very high first-pass comprehension rate.
After the first round, redesign only one or two variables at a time so you can learn what actually improved comprehension. If you change everything at once, you may get a better symbol but you will not know why.
Retest with some of the same people and some new people, because both perspectives matter. Repeat participants show whether the design is learnable, while new participants show whether it is intuitive.
If you have multiple sites, test across sites, because local habits can bias interpretation. A symbol that works in a food plant may fail in a fabrication shop because the objects people recognize are different.
Document your test results even if they are messy, because they justify design choices later. When someone asks why the icon looks “too simple,” you can point to the data that simple was clearer.
Documenting usage rules so your system stays consistent
A custom pictogram is not finished when the vector file exports cleanly, it is finished when you can control how people use it. Without rules, someone will stretch it, recolor it, add text inside it, or place it on the wrong sign category.
Misuse is not just an aesthetic problem, because it breaks recognition over time. When the same icon appears in three different styles, people stop trusting what it is supposed to signal.
Create a one page spec for each symbol with its meaning, allowed variants, and prohibited edits. Include minimum size, clear space, and what background colors are allowed without reducing contrast.
The spec should also state whether the symbol can be mirrored, rotated, or combined with other elements. Some symbols survive rotation, but others turn into a different message when flipped.
Include examples of correct and incorrect usage, because people follow pictures better than rules. A small “do not” section prevents the most common mistakes, like putting the icon inside a different shape because it “fits better.”
Also document how the symbol fits your larger catalog, because symbol development is easier when designers can reuse parts. If you standardize arrows, human figures, gloves, and containers, you cut redesign time and you keep a coherent visual voice.
Reusable parts also improve comprehension because repeated components become familiar. When the same glove shape appears across multiple PPE symbols, the viewer learns the pattern faster.
Define file formats and naming conventions, because “final_final2.svg” is how systems drift. A clean naming scheme makes it obvious which file is approved and which one is an experiment.
Version control matters even for signage, especially across multiple sites or contractors. Assign an ID, a date, and an owner, then keep retired symbols in an archive so they do not sneak back onto a new poster.
Ownership should include who has authority to approve changes, because committees can accidentally create Franken-symbols. A single accountable owner can still take input, but they keep the system coherent.
Set a review cadence, even if it is just annually, to catch symbols that no longer match equipment or procedures. A pictogram that shows an outdated machine model can confuse new hires who have never seen the old one.
Finally, store the rules where people actually look, like in your EHS portal, your print vendor packet, and your contractor onboarding materials. Documentation that lives in one designer’s laptop is not documentation, it is a future problem.
Conclusion
Creating custom safety pictograms works best when you treat it like engineering, not decoration. You define the message, sketch hard, borrow proven conventions, and then prove comprehension with simple tests.
The discipline is mostly about restraint, because the best symbols are the ones that survive distance, dirt, and distraction. When you remove the nonessential, the essential becomes obvious.
If you also write down usage rules and enforce sign system consistency, your custom symbols stop being one offs and start acting like a real standard. That is how a site builds a sign library people trust under pressure.
Over time, that trust turns into faster compliance, fewer near misses, and fewer arguments about what a sign “was supposed to mean.” A good pictogram is quiet, but it changes behavior in the moments that count.