Pallets move fast in warehouses, and that speed is exactly why markings on the load matter. If the only symbols are on individual cartons, the forklift driver and the strap crew still have to guess what the whole unit can handle.
Handling symbols for pallets turn a wrapped, mixed load into something readable from ten feet away. When you mark where to lift, where the weight sits, and how high you can stack, you cut down on damaged product and bent racking.
I have watched perfectly good freight get scrapped because the load looked stable until the forks hit it slightly off center. A few clear pictograms on the outside would have changed that outcome.
This article focuses on pallet-level symbology that works in real operations, not labels that only make sense on a spec sheet. You will see where the center of gravity symbol belongs, how a lifting points pictogram prevents bad picks, and when a stacking limit symbol should override what the boxes claim.
Why pallet-level pictograms matter more than box-level symbols
Box-level symbols assume the box stays upright, isolated, and easy to grab, which is rarely true once it is built into a unit load. A pallet is a new object with its own weak spots, weight distribution, and failure modes.
Once cartons are interlocked, banded, or wrapped, the original handling marks stop being the main story. The pallet becomes the thing being handled, and it needs its own instructions.
Box symbols also assume the carton is visible, but most unit loads are wrapped for stability and security. If the crew cannot see the carton marks, those marks cannot protect the freight.
Stretch wrap hides corner crush, mixed case orientations, and that one heavy carton buried near the top. Handling symbols for pallets give the crew a quick read on the unit load even when the packaging underneath is invisible.
Even when cartons are visible, they can contradict each other on a mixed pallet. A pallet-level set of pictograms resolves the conflict by stating what is true for the whole unit.
Forklift operators do not have time to walk around and decode ten different carton marks. A single, consistent set of pallet-level pictograms reduces the mental math that causes rushed decisions.
In busy aisles, the operator is also watching pedestrians, rack beams, and other trucks. The less time they spend interpreting packaging, the more attention they can keep on safe travel.
Box symbols also fail when the pallet has returns, kitted items, or a custom build for one customer. In those situations, pallet markings are the only honest communication about what is safe to do next.
Rework stations are another place where carton symbols lose meaning, because loads are rebuilt with different patterns and different void fill. If the pallet gets rewrapped, the pallet-level pictograms should be refreshed as part of the rebuild.
Pallet-level pictograms also help downstream partners who never see your internal paperwork. A carrier, a cross dock, and a customer warehouse can all follow the same basic symbols if you keep them simple and consistent.
When you treat the pallet as a product with its own label set, you also create accountability. If a load is built wrong, the absence of a correct symbol is a visible gap that can be fixed before shipping.
Symbols that guide lifting, forks, and lifting points
The fastest way to damage a load is to pick it from the wrong side or to shove forks too high into the product. A fork entry pictogram, paired with a clear “fork here” mark, keeps the pick consistent across shifts.
Fork entry marks matter most on pallets with partial bottom boards, perimeter bases, or skids that only accept forks from two sides. If you do not mark entry points, someone will eventually try the blocked side and split the base.
On long loads, fork spacing is as important as fork direction. A simple note near the pictogram that implies wide fork placement can prevent the classic “speared in the middle” bend.
For skidded machinery, crates, or long cartons, a lifting points pictogram is worth its ink. It tells the operator where the load can take force, which is different from where it merely looks convenient to lift.
Some loads have a strong base but weak faces, like appliances with thin skins or products with exposed coils. A lifting points pictogram can steer the operator away from pressure points that dent or crack the product inside the wrap.
The center of gravity symbol belongs on the outside of the unit load, not buried in paperwork. If the weight is offset, the symbol should show direction and distance, because “heavy side” is too vague when forks are already under the pallet.
CG marks are especially useful when the pallet looks symmetrical but is not, like a mixed load where the dense cases are all on one corner. The operator can then approach with the right fork position instead of discovering the imbalance mid-lift.
I prefer markings that assume the operator is moving quickly and sees the load at an angle. Put the lifting points pictogram and center of gravity symbol on at least two adjacent faces so they are visible from the approach path.
If your facility uses both pallet jacks and forklifts, design the marks for both. A pallet jack operator also benefits from knowing which side is safe to enter and which side is likely to drag or collapse.
Keep the pictograms large enough to read through glare and shrink film reflections. If the symbol cannot be read under warehouse lighting, it will not be read during a busy shift.
Also consider the reality of damaged wrap and scuffed labels. Redundant placement and simple shapes survive abuse better than detailed, tiny icons.
Stacking and load limit pictograms to prevent collapse
Stacking failures usually start with a reasonable-looking decision that turns wrong after a few hours under compression. A stacking limit symbol makes the rule visible at the moment someone is about to put another pallet on top.
Compression damage is slow and quiet, which is why it gets underestimated. By the time the bottom cases bulge, the trailer is already sealed or the pallet is already buried in a lane.
A good stacking limit symbol also prevents the “temporary stack” that becomes permanent. People stack high to clear the floor, and then the load sits that way until it fails.
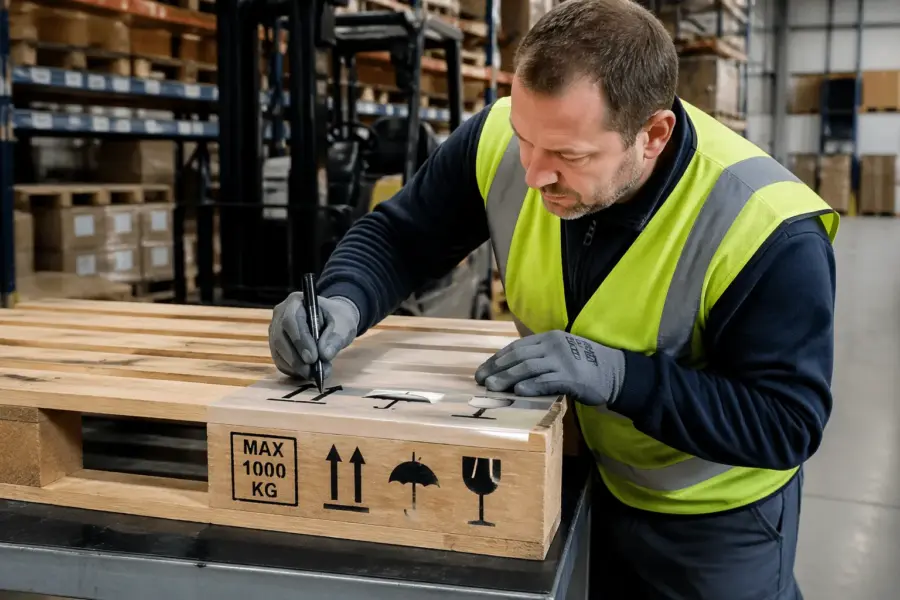
Load limit pictograms matter even more for mixed pallets, because the weakest box sets the real limit, not the strongest. If you ship in pooled pallets, add the unit load weight and a top load limit so carriers do not treat every pallet like a brick.
In many warehouses, the heaviest pallet is not obvious because the wrap and footprint look the same. A maximum unit load weight mark helps operators decide whether a smaller truck, a walkie stacker, or a high-reach lift is appropriate.
Top load limits also protect product during trailer loading where double stacking is tempting. If the top pallet shifts even slightly, the bottom pallet takes uneven point loads that crush corners first.
Do not stack marks are not just for fragile goods, because some loads fail due to geometry rather than fragility. A tall, narrow pallet can be perfectly strong and still be unsafe to stack because the combined stack becomes unstable.
Clamp truck prohibited marks prevent a common mismatch between equipment and packaging. If you run both forks and clamps, the symbol saves the load from being treated like a paper roll pallet when it is really light corrugate over air.
| Pictogram | What it tells the crew | Common warehouse use |
|---|---|---|
| Stacking limit symbol (max number of pallets) | Maximum stack count for storage or transit | Floor stacking in staging lanes |
| Top load limit (kg or lb) | Maximum allowable weight placed on top | Trailer loading and double stacking |
| Do not stack | No load is allowed on top at any time | Fragile assemblies, displays, returns |
| Clamp truck prohibited | Clamps will crush or deform the load | Paper goods, light corrugate, bagged product |
| Maximum unit load weight | Total pallet weight for handling and racking | Forklift capacity checks and rack ratings |
Make sure the numbers on stacking and weight marks reflect real conditions, not best-case lab tests. Humidity, long dwell times, and vibration in transit all reduce what a load can tolerate.
If your loads go into high-bay racking, the limit marks should align with rack ratings and beam capacity. A pallet that is safe on the floor can still be unsafe in a rack if the base is weak or the weight is concentrated.
It also helps to separate what is a storage rule from what is a transport rule. A pallet might be safe to stack two high in a static warehouse lane but unsafe to stack in a trailer where bounce adds dynamic load.
When you standardize these pictograms, you reduce the need for tribal knowledge. New hires can follow the same visible rules as veterans without learning the hard way.
Marking overhang, tilt risk, and stability concerns
Overhang is one of those problems people ignore until the first time a pallet clips a doorway or a rack upright. If the load overhangs the pallet deck, mark the footprint so handlers understand the true clearance and fork spacing needed.
Overhang also changes how the load behaves when it is set down, because the overhanging cases can take impact first. A footprint mark reminds the driver to place the pallet gently and squarely.
In trailers, overhang can interfere with load bars, e-track straps, and neighboring pallets. When the footprint is marked, the loader can plan spacing without trial and error.
Tilt risk shows up when tall product, liquid containers, or loose inner packs shift during acceleration and braking. A clear “keep upright” symbol helps, but it works better when paired with a center of gravity symbol that shows the load is top heavy.
Top-heavy loads also need different fork behavior, including lower travel height and slower turns. A tilt-risk message is a reminder that the load is not forgiving if the operator drives like it is a solid cube.
If your pallet has a known tipping direction, say that with an arrow rather than a generic warning. Operators can then orient the pallet so the most stable face leads during travel.
Stability is also about where straps and wrap can safely apply pressure. If a load has a soft side, a fragile face, or a protruding component, mark it so the strap crew does not cinch down in the worst place.
Some products have hidden weak zones, like blister packs that crack under point pressure or molded parts that deform under tension. A simple “no pressure” pictogram on that face can prevent damage that looks like mishandling later.
I have seen a single misapplied strap turn a stable pallet into a leaning tower by crushing one corner and loosening the wrap. Simple pictograms that warn “do not strap here” or “strap over edge protectors” stop that kind of slow-motion failure.
Corner boards and edge protectors only work if the strap actually rides on them. Marking the strap path makes it more likely the crew uses the protection you paid for.
Stability concerns also include what happens when the pallet is tilted back on a forklift. If the load cannot tolerate tilt, a clear warning can stop the habit of carrying everything leaned back aggressively.
When you mark stability issues, you are also protecting equipment and people. A tipped pallet can take out racking, product, and a pedestrian in a single moment.
How to use center of gravity symbol and orientation marks together
The center of gravity symbol is most useful when it is tied to a clear “front” or “fork approach” orientation mark. Without that reference, the symbol can confuse a driver who sees it from the back side of a wrapped pallet.
Orientation marks reduce the chance that a pallet gets spun during staging and then handled incorrectly later. A simple “this side out” approach keeps the CG information meaningful across multiple touches.
For offset loads, add distance marks like “CG 8 in toward this face” so the operator can adjust fork position. If your operation uses metric, keep it metric everywhere, because mixed units cause mistakes when people are rushed.
If you cannot measure the CG precisely, do not fake precision with a random number. Use a directional CG mark and a conservative handling instruction, because false accuracy creates overconfidence.
When the pallet is built for a specific route, orientation marks should match the trailer plan. If the load must ride with the heavy side toward the nose of the trailer, say that with a simple arrow and keep-upright symbol on the same face.
Orientation also matters for temperature-sensitive goods if airflow patterns are part of the packaging design. If vents or breathable faces exist, mark them so the load is not pressed against a wall that blocks airflow.
Do not treat CG markings as a paperwork exercise for engineers only. A driver who understands the balance point will brake differently, turn wider, and keep forks lower, which is exactly what you want.
CG and orientation marks also help when pallets are transferred between equipment types, like from a forklift to a clamp truck or from a dock to a conveyor interface. The marks give the next handler the same baseline understanding without a handoff conversation.
Place the CG symbol so it is not hidden by shipping labels, BOL pouches, or customer paperwork. If the paperwork covers the symbol, the symbol might as well not exist.
When you train crews, show them a real example of a load that looks balanced but is not. That demonstration makes the CG symbol feel like a practical tool rather than a compliance sticker.
Where to place symbols on stretch wrap, placards, and corner boards
Symbols belong where the handler’s eyes naturally go, which is usually mid-height on the load, not near the pallet deck. If you place pictograms too low, forks and pallet jacks will scrape them off before the load leaves the building.
Mid-height placement also avoids the shadow line created by pallet overhang and fork pockets. The goal is a clean visual field that is readable while approaching.
Stretch wrap printing looks clean, but it can distort when the film stretches around corners. I like a rigid placard under the outer wrap for the main handling symbols for pallets, then small repeats on the film for quick scanning.
Placards also survive scuffs better than ink on film, especially in tight rack aisles. If the placard is under the final wrap layer, it stays attached and resists peeling.
Corner boards are an underrated place for instructions because they are rigid and already sit on the edges people interact with. A strap guidance mark on a corner board is hard to ignore when the strap is in your hands.
Do not put critical symbols only on the top of the load, because most people cannot see the top in a trailer or a rack. Top placement is fine as a repeat, but not as the primary location.
Also avoid placing pictograms where a stretch wrap seam or overlap will cut through them. A symbol split by a seam reads like clutter instead of instruction.
If you use clear wrap, consider backing the placard with a high-contrast panel so the symbol does not disappear into a busy carton pattern. If you use opaque wrap, make sure the symbol color contrasts with the film.
Think about how the pallet will be staged, because one face is often against a wall or another pallet. That is why two adjacent faces are the minimum for anything important.
- Place key pictograms on two adjacent faces
- Mount placards under the final wrap layer
- Keep symbols above fork impact zones
- Repeat orientation arrows near the top edge
- Print weight and stacking limit symbol in large numerals
- Use corner boards as strap guidance surfaces
- Avoid placing marks across wrap seams
If you use RFID or barcode labels, keep them separate from handling pictograms so scanning does not cover the safety message. People will slap the scan label wherever it fits, so reserve a dedicated zone for handling marks.
For export shipments, consider weather exposure at docks and ports. A water-resistant placard stock and adhesive prevents the symbols from turning into pulp before the container is even sealed.
When loads are rewrapped, make symbol placement part of the standard work. If the rewrap station does not reapply the pictograms, the load leaves with no guidance at the exact moment it is most likely to be unstable.
Finally, keep placement consistent across SKUs and customers. Consistency is what makes a symbol readable in a glance, because the eye learns where to look.
Stacking limit symbol details that crews actually follow
A stacking limit symbol works when it is specific, easy to read, and consistent with how your warehouse stacks. If the symbol says “max 2,” but supervisors routinely allow three high “just for an hour,” the mark becomes background noise.
Crews follow what gets enforced, not what gets printed. If you want the symbol to matter, the operation has to treat it like a rule instead of a suggestion.
Use stack count when height is the real constraint, and use top load limit when weight is the real constraint. For many consumer goods, two pallets can be safe if they are light, while one heavy pallet can crush the lower load even at a single stack.
When both height and weight matter, use both pictograms and let the stricter one win. That keeps the decision simple when the lane is full and people are moving fast.
Match the pictogram to the storage method, because racking changes everything. A pallet that cannot be floor stacked can still be rack stored, but only if the unit load is stable and the rack beams carry the weight correctly.
If you use push-back or drive-in racking, stability rules get tighter because pallets contact each other and experience more bumping. In those systems, a conservative stacking limit symbol can prevent chain-reaction damage.
When loads travel through cross docks, the stacking limit symbol should be visible from the side, not just the end. Cross dockers often stage pallets in tight rows, and they decide stack height based on what they can see without moving anything.
Cross docks also mix freight from many shippers, which means your pallet will be stacked by someone who does not know your product. A clear symbol is your only voice in that moment.
Make the stacking limit easy to verify from a distance by using large numerals and a clean icon. If someone has to walk up to read it, they will not read it.
It helps to standardize where the stacking symbol goes, such as the upper right of the main placard. Crews learn the location and check it automatically during staging.
If your operation uses temporary labels, make sure they do not cover the stacking limit symbol. A covered symbol is functionally the same as no symbol, and the stack decision will default to convenience.
When a pallet is partially picked, the stacking limit can change because the top layer might no longer distribute load. In those cases, a quick re-evaluation and an updated mark can prevent a collapse in the pick module.
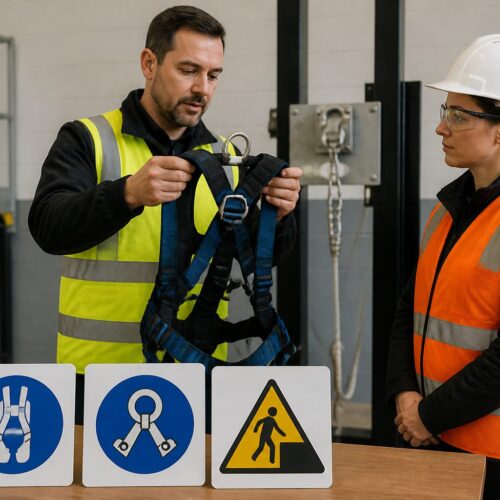
Using lifting points pictogram for straps, slings, and cranes
Some pallets are not meant for forks at all, like long steel bundles, fragile assemblies, or export crates with internal skids. A lifting points pictogram tells riggers where slings or spreader bars can connect without crushing the product.
Even when forks are allowed, some loads require a specific fork position to avoid bending or puncture. A lifting points pictogram can double as a “support here” message for forks, not just slings.
Strap placement is part of lifting, because straps can become lifting aids during repositioning. If you want straps over corner boards, mark the corner boards themselves so the crew has a physical target, not a guess through stretch wrap.
Straps also influence stability during transport, especially when pallets are turned sideways in a trailer. A clear strap path mark helps the loader keep the load square and tight without crushing the product.
For machinery, show whether the lifting points require shackles, hooks, or web slings, and keep the mark close to the actual hardware. If the crate has a lifting beam requirement, say it plainly, because a single-point lift can tip a load fast.
If the load requires a spreader bar to avoid inward compression, the pictogram should imply that the sling legs must stay vertical. That one detail prevents the common mistake of choking the top of a crate until it bows.
Do not mix “lift here” with “tie down here” unless the same point is rated for both. I have seen people hook to a tie down ring that was fine for restraint, then tear it out when they tried to lift the full weight.
If you have both lift points and tie-down points, mark them with different icons and keep them separated. The goal is to remove ambiguity when someone is working under time pressure.
Also consider how the load will be handled at the customer site, where equipment may differ from yours. A lifting points pictogram can prevent a customer from improvising with a forklift when the load was designed for crane lift.
When you can, include the rated capacity of the lifting points on the same placard. A rigger who sees the rating is less likely to assume the points are stronger than they are.
Finally, keep the lifting points pictogram clean and uncluttered. In rigging, a simple, readable instruction is safer than a crowded label no one trusts.
A simple pre-move inspection routine you can follow
Before you move any pallet that has special markings, stop for ten seconds and confirm the symbols match what you see. If the load looks rebuilt, rewrapped, or partially picked, treat the markings as suspect until you verify.
That pause is also a chance to check for obvious lean, broken wrap, or a shifted top layer. If the pallet looks like it is already failing, the safest move is often to stabilize it before traveling.
Start with the pallet itself, because broken deck boards and missing bottom boards change how forks support the load. If the pallet is damaged, the best pictograms in the world will not keep the unit load stable.
Check for protruding nails, split stringers, and crushed corners that could snag on rack beams or tear wrap. Those small defects are what turn a normal pick into a sudden spill.
Next, check the center of gravity symbol and compare it to the visible heavy side, like motors, liquid, or dense cartons. If the CG mark looks wrong, reposition the forks conservatively and move the load slowly to a safe area for correction.
Also check fork entry pictograms against the actual base, because pallets get rotated and rebuilt. If the base only accepts forks from two sides, confirm you are on the correct approach before committing the forks.
Look at the wrap pattern and the condition of edge protectors, because loose wrap can hide a shifting load. If the wrap is torn or the top is loose, rewrap or strap before you move it through traffic.
Finally, confirm the stacking limit symbol and any top load limit before you place the pallet in staging or in a trailer. If you cannot honor the limits because space is tight, escalate it, because a crushed load costs more than a few minutes of reshuffling.
If the pallet is going into a rack, confirm the unit load weight against the rack bay rating and the truck capacity at that lift height. A safe pallet on the floor can become unsafe at elevation if the equipment is near its limit.
When you find a mismatch between markings and reality, do not just work around it and move on. Fixing the label and the load at the source prevents the same problem from repeating on the next shift.
This routine is not about slowing down the warehouse, because it prevents the longer delays caused by spills, rework, and claims. Ten seconds of inspection is cheap compared to an hour of cleanup.
Conclusion
Handling symbols for pallets work when they are visible, consistent, and tied to how people actually move freight. If you mark lifting, balance, and stacking clearly, you reduce the quiet, repeat damage that operators learn to accept as normal.
Good pallet symbology also reduces arguments after something goes wrong, because the expected handling is visible. When the rule is on the load, it is easier to coach, correct, and improve.
Use the center of gravity symbol when the load is even slightly tricky, and treat the lifting points pictogram as a safety control, not a decoration. Put a stacking limit symbol where it can be read during staging, because that is where most bad stacking decisions happen.
Keep the pictograms simple enough that a new hire can follow them on day one. If the marks require a legend, they will not be used when the dock is busy.
The goal is simple, make the safe move the easy move for the next person who touches the pallet. When your markings do that, forklifts, straps, and racking all last longer, and your freight arrives looking like it should.
Over time, these small improvements show up as fewer claims, fewer rewraps, and less product that has to be discounted due to cosmetic damage. Clear pallet-level pictograms are one of the lowest-cost controls you can add to a fast-moving operation.