Returns are where good inventory goes to die, unless you run the area like a production line. The fastest way to lose money is to let returns sit in piles because nobody knows what happens next.
Wayfinding for returns and reverse logistics areas is different from outbound picking because the product status changes every few feet. One tote can hold a perfect item, a missing parts item, and a hazmat problem, and your signs have to keep up.
I have walked into returns cages where every shelf had a hand written note, and every note contradicted the next one. That kind of ad hoc labeling turns reverse logistics into a guessing game that burns labor and creates shrink.
Good returns area signage does not try to be fancy, it tries to be unmissable. If a new associate can route an item correctly on day one, you are already ahead.
Why returns areas need their own wayfinding strategy
Outbound areas move one direction toward shipping, but returns bounce between questions like “Can we sell this?” and “Is this even ours?”. That uncertainty is why wayfinding for returns and reverse logistics areas needs its own rules, its own colors, and its own language.
In outbound, a location label usually answers one question: where does this SKU live. In returns, a label has to answer two questions at once: what is this item now, and what is it allowed to become next.
Returns also carry more ambiguity than any other flow because the packaging lies. A sealed box can be empty, and a beat up box can contain a perfect product, so your signs must steer behavior instead of trusting appearances.
When you reuse outbound aisle signs in a returns zone, people start treating returns like regular stock. That is how a customer return ends up back in pick faces before anyone checks serial numbers or accessories.
That mistake is not just a quality issue, it is a fraud and compliance issue in the wrong categories. Electronics, medical devices, and high value items need a visible barrier between “received” and “approved,” and signage is that barrier.
Returns also pull in more departments than most warehouse processes, including quality, compliance, refurb, and sometimes finance. If the signage does not show who owns the next step, items stall while people look for a supervisor.
Even when the departments are not physically present, their rules still are. Returns area signage should make those rules obvious, so the associate does not need to remember which categories require photos, which require testing, and which require immediate quarantine.
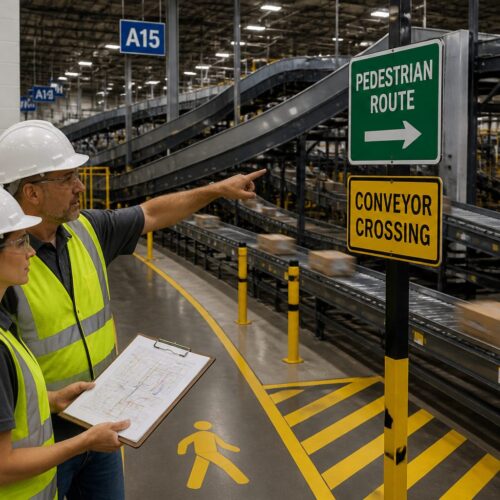
The physical space usually works against you because returns get shoved into leftover corners near receiving doors. A tight corner can still run clean if the signs define lanes, queue points, and clear “stop here” markers for each decision.
Without clear lanes, returns becomes a parking lot where pallets block benches and carts block exits. A few large directional signs and floor arrows can turn that same corner into a predictable loop that people can follow under pressure.
The other reason returns needs its own strategy is that it is a mix of micro processes, not one process. One item needs a quick restock scan, another needs a serial capture, and another needs a battery removal step, so wayfinding has to guide branching paths.
If you can walk the area and tell what is happening just by the signs, you have a controllable system. If you have to ask three people what a pile means, you have a returns area that will always be one surprise away from chaos.
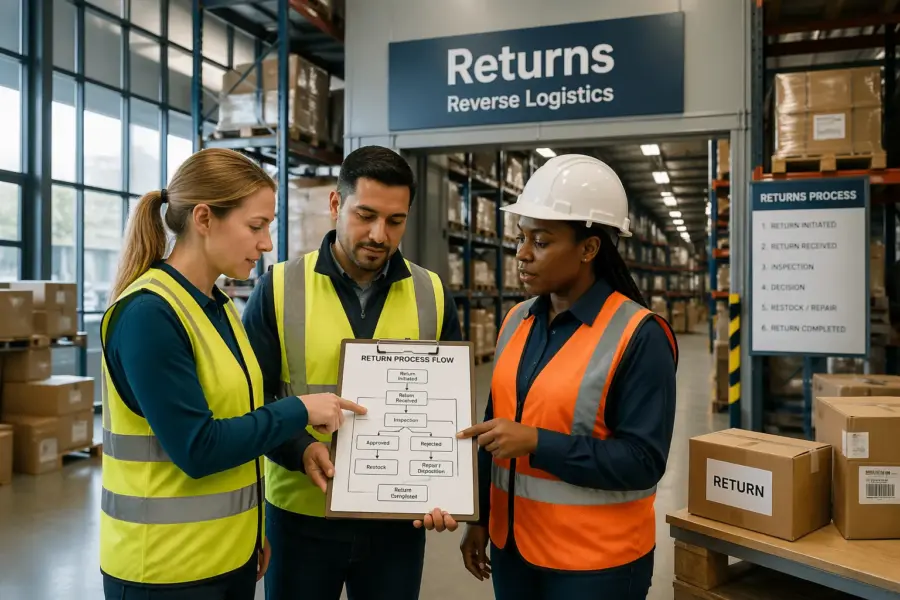
Defining the returns flow: receive, inspect, sort, and route
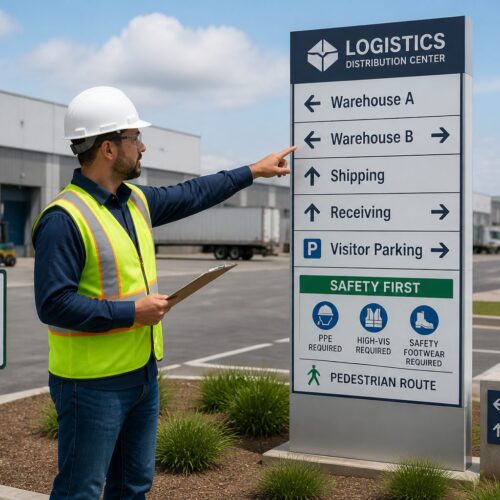
The cleanest reverse logistics operations map the flow like a simple four step loop: receive, inspect, sort, and route. Your wayfinding for returns and reverse logistics areas should mirror that loop with big zone headers that match the verbs people use on the floor.
Those verbs matter because people repeat them in their heads while they work. If the wall says “Processing Area 3” but the SOP says “Inspect,” you just created translation work that adds seconds to every touch.
Start by defining where the loop begins, because returns often arrive through multiple doors and multiple carriers. A single “RETURNS START” sign with a bold arrow prevents the common problem of cartons landing at the nearest empty spot.
At the receive point, the sign should tell associates what must happen before anything moves, like “scan RMA,” “verify carrier label,” and “attach internal license plate.”. If you skip this, you end up with mystery cartons that nobody can research later.
Receiving signage should also call out what to do when the paperwork is wrong, because it will be wrong. A small callout like “no RMA: park in EXCEPTIONS” saves hours of detective work and prevents people from inventing their own workaround pile.
It also helps to label the physical tools at receiving, not just the zones. If the tape gun, scale, printer, and camera have labeled homes, the station stays ready and the next shift does not lose time hunting for basics.
Inspection station labels need to be consistent across every bench, even if the benches handle different product families. If one station says “QA” and another says “Check,” you will watch items drift to the path of least resistance.
Inspection signage should include the minimum required checks for that category, not the full SOP. A two line reminder like “confirm serial, confirm accessories” beats a laminated binder that nobody opens when the line is backed up.
Sort is where you separate by decision type, not by SKU. A good “SORT” sign should be paired with smaller sub signs like “awaiting test,” “awaiting parts match,” or “awaiting photo,” so the work does not collapse into a single mixed queue.
Sorting also benefits from visible capacity limits. If a rack sign includes a simple “MAX: 12 totes” note, it forces overflow to move to the correct buffer zone instead of stacking on the floor where it becomes invisible to the system.
Routing is where reverse logistics wins or loses money, so the last sign in the chain should be the most specific. A sign that says “Disposition” is too vague, but a sign that says “Route: Restock, Repair, Recycle, Vendor return” forces a decision.
Routing signage should also define what “done” looks like for each route, because partial completion creates rework. If “RESTOCK” requires a location scan and a label print, say that on the sign so items do not sit in a green zone without being system-ready.
When you define the loop clearly, you can also define the escape hatches. Every returns area needs an “EXCEPTIONS” lane with clear rules, because exceptions are not rare, they are the normal tax of reverse logistics.
The goal is not to eliminate exceptions, it is to keep them from infecting the main flow. A clearly labeled exceptions rack with a time limit note like “review daily” keeps the weird stuff from becoming permanent furniture.
Clear labels for disposition zones: restock, repair, recycle
Disposition zone signs are where your process turns into physical reality, because every item must land somewhere. If the zones are unclear, people create a “hold” pile that quietly becomes the biggest location in the building.
That hold pile feels safe in the moment because nobody wants to make the wrong call. The problem is that time is also a disposition, and time usually turns sellable into obsolete.
The best disposition labeling uses plain words that match system codes, so “RESTOCK” maps to the WMS disposition and shows up on the same screen. When the sign and the screen disagree, the sign loses and the error rate climbs.
Match the exact spelling and capitalization if you can, because people copy what they see. If the WMS uses “VENDOR_RETURN” and the wall says “Supplier Sendback,” you will get inconsistent notes, inconsistent labels, and inconsistent reporting.
Disposition signs should also define what is not allowed in that zone, because people learn faster from boundaries. A restock sign that includes “no opened, no missing parts, no odor” prevents the slow creep of borderline items into sellable inventory.
Give each disposition zone a physical identity beyond the sign, like a dedicated rack style or dedicated container type. When the rack itself is recognizable, the sign becomes reinforcement instead of the only control.
Restock zones should be designed for speed, because they are the money path. If the restock sign includes a quick checklist cue, like “complete, clean, correct SKU,” you reduce the number of items that boomerang back as customer complaints.
Repair zones should be designed for traceability, because repair without tracking is just loss with extra steps. A repair sign that reminds associates to tag defect codes and capture serials keeps the refurb team from inheriting anonymous problems.
Recycle zones should be designed for safety, because recycling is where hidden hazards show up. A recycle sign that calls out battery removal, liquid handling, or sharp edges prevents incidents and keeps your waste stream compliant.
Quarantine signage should be loud and repetitive on purpose. If a quarantine area only has one small sign, it will become a convenient overflow spot the first time the floor gets busy.
Vendor return zones benefit from signage that includes paperwork reminders, because missing paperwork is the most common reason credits get delayed. A simple “pack slip required” cue saves you from a month-end scramble to rebuild documentation.
Also consider adding a small “last touched” label holder at each disposition zone. When a pile builds up, that one field lets you see whether the issue is capacity, staffing, or a sign that is not clear enough.
| Disposition zone | What qualifies | Sign details that prevent mistakes |
|---|---|---|
| Restock | Unopened, complete, resale approved | Green header, “scan to stock” icon, accessory checklist cue |
| Repair | Functional issue, cosmetic damage, missing parts | Blue header, wrench icon, “tag defect code” reminder |
| Recycle | Broken beyond repair, expired, unsafe to sell | Gray header, recycle icon, “remove battery” callout |
| Quarantine | Leak, odor, hazmat indicator, unknown liquid | Red header, stop hand icon, PPE requirement note |
| Vendor return | Warranty return, supplier credit required | Purple header, supplier code field, “pack slip required” cue |
The table is only useful if you actually build the zones to match it. If you list five dispositions but only have three physical destinations, people will invent the missing two with cardboard and hope.
Make sure each zone has enough facing space for the volume you really see, not the volume you wish you saw. When a zone overflows, it spills into the nearest zone and your clean categories become mixed categories.
It also helps to add small “examples” photos on the sign for tricky categories. A picture of a missing charger, a cracked screen, or a broken seal can settle debates without calling a lead every five minutes.
If you run multiple clients or brands, add a second layer of labeling that is still simple, like a client code strip under the main disposition header. The key is that the disposition stays the primary label, because disposition drives risk and value.
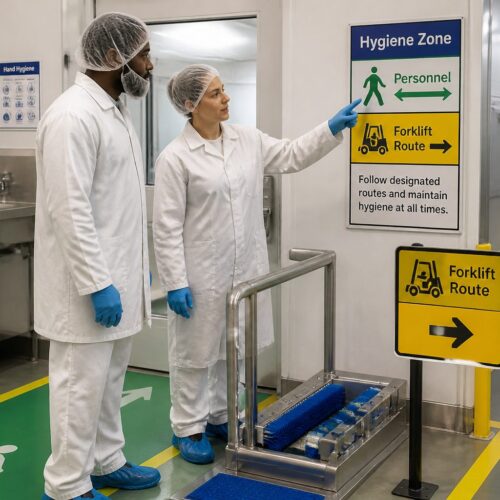
Symbols and color cues for fast sorting decisions
Symbols matter in returns because people sort while holding product, and they do not want to read a paragraph on a wall. A clear icon set paired with color bands makes wayfinding for returns and reverse logistics areas work at walking speed.
Icons also help when your workforce has mixed languages, mixed literacy levels, or a lot of temps. A good symbol system lets you train the motion first, then fill in the details later.
Pick a small symbol library and stick to it, like a box with a check for restock, a wrench for repair, and circular arrows for recycle. If you invent a new icon every month, your walls start looking like a patchwork of clip art.
Consistency matters more than artistic quality, so use simple shapes with thick lines. A fancy detailed icon looks good on a computer screen and disappears from ten feet away under warehouse lighting.
Color should carry meaning, not decoration, so limit it to a few process states that never change. Green for sellable, red for stop or quarantine, and blue for work in progress is easy to teach and hard to confuse.
Do not overload color with too many meanings, because people will forget the difference between teal and turquoise at 2 a.m. If you need more categories, use text and icons first and reserve color for the big risk boundaries.
Use the same colors on floor tape, bin labels, and screen headers if you control the software UI. When the tote label, the rack sign, and the monitor all match, people trust the system and move faster.
If you cannot change the software UI, you can still match colors on printed paperwork, tote tags, and station headers. The point is to reduce the number of translations an associate has to do between physical space and digital instructions.
Place the color band at the top of the sign where it is visible over a cart or a pallet. If the color is only at the bottom, it gets blocked by product and stops working when you need it most.
Size matters too, because a small label is not a sign, it is a suggestion. In returns, the default motion is to keep moving, so your cues have to be readable in a half second glance.
Use arrows sparingly and make them honest, because too many arrows create noise. A single large arrow that points to “QUARANTINE” is better than a cluster of arrows that point everywhere and mean nothing.
Also think about color blindness and low light conditions when you pick your palette. Pair every color with a distinct icon and a bold word so the meaning survives even when color does not.
When you roll out new symbols, do it with a controlled changeover instead of a slow drift. A one day swap where you remove the old signs prevents the mixed-era problem where half the area speaks one visual language and half speaks another.
Preventing cross-contamination between sellable and non-sellable
Cross contamination in returns is not a metaphor, it is literally mixing sellable goods with trash, leaks, and unknown conditions. Once that happens, you either risk shipping a bad item or you downgrade good items because nobody trusts the batch.
It also creates hidden labor because someone eventually has to re-sort the mess. That re-sort is slower than doing it right the first time, because now every item is suspect and needs extra handling.
Returns area signage should create hard boundaries, especially between “sellable pending inspection” and “non sellable pending disposal.”. A simple sign that says “STOP, inspection required before restock” belongs at the exact point where shortcuts usually happen.
Put that stop sign at hand height where the cart naturally pauses, not on a back wall that nobody looks at. If the sign is not placed at the decision point, it becomes decoration and people will step around it.
Give non sellable items their own containers that look different, like red lidded totes or black gaylords with big disposition zone signs on two sides. If the container looks the same as a standard tote, people will treat it the same in a rush.
Container signage should also include a clear “do not open” or “do not mix” message when appropriate. The fastest way to contaminate a stream is to let people toss one more item into a container because it is convenient.
Inspection station labels should also call out hygiene and safety rules for categories like apparel, baby products, and medical devices. If you handle returns for cosmetics, add a clear “opened cosmetics to discard” sign and enforce it every shift.
For soft goods, add signage that separates “clean and resalable” from “needs laundering” or “discard,” because smell and stains are not always visible in a quick check. Without that separation, you will either ship bad product or throw away good product out of caution.
Electronics need their own contamination controls because batteries and liquids do not mix. A small sign that says “remove battery before recycle” and “liquid damage to quarantine” prevents dangerous combinations from landing in the same gaylord.
Food and consumables are their own world, and signage should treat them like it. If your operation touches any ingestible products, a clear “no restock” rule for opened consumables should be posted where people cannot miss it.
Cross contamination can also be digital, not just physical. If an item is physically in quarantine but still shows as available in the system, you will contaminate outbound orders with returns risk.
Use signage to enforce system discipline, like “no move without scan” at the boundary between zones. That one rule, posted in the right place, stops a lot of well meaning shortcuts that create inventory ghosts.
Finally, make sure your sellable zones are clean and look different from the rest of returns. If the restock staging area looks like a junkyard, associates will treat it like one and your standards will drift.
Training and onboarding: teaching the visual system quickly
Training fails when it depends on one good trainer and a quiet day, because returns never stay quiet. The point of wayfinding for returns and reverse logistics areas is to move knowledge from tribal memory onto walls, racks, and labels.
That visual system is your silent trainer, and it works every shift without getting tired. If your signs are clear, you can absorb new hires, temps, and transfers without resetting the whole operation.
On day one, walk new hires through the flow and make them touch each sign, because physical interaction locks in the map. Then test them with real items, not flashcards, and correct mistakes at the sign where the decision happens.
Keep the first day focused on the big decisions, not the edge cases. If they can reliably choose between restock, repair, recycle, and quarantine, you can layer in client rules and defect codes after they stop making dangerous mistakes.
Use the signage as the script for training, so the trainer points at the same words the associate will see later. When training language matches wall language, you reduce the “my trainer said” problem that creates inconsistent habits.
It also helps to build a short “sign tour” into every shift start for the first week. Five minutes of repetition at the same signs beats an hour of lecture that disappears as soon as the line gets busy.
When you change a sign, treat it like a process change, not a decoration change. Announce it, explain why it changed, and remove the old version so people do not keep following yesterday’s map.
Supervisors should coach by walking to the sign, not by arguing across the floor. If the sign is wrong, fix the sign, and if the sign is right, the coaching becomes objective instead of personal.
For high turnover environments, add a quick reference station at the entrance with the same colors and icons as the floor. That way the associate sees the legend before they touch product, which reduces early mistakes.
- Post a one page zone map at the returns entrance
- Match tote colors to disposition zone signs
- Use identical inspection station labels at every bench
- Add “stop and scan” markers at handoff points
- Place defect code cheat sheets at eye level
- Label quarantine with red signs on two walls
Make sure the zone map is oriented to the viewer, not to the building blueprint. If the map does not match what people see when they look up, they will ignore it after the first glance.
Cheat sheets should be short enough to be used, not complete enough to be impressive. A list of the top ten defect codes by volume will do more than a full catalog that requires scrolling and searching.
Build a habit of asking new hires to explain the colors back to you. If they cannot say what red means in your building, they are one rushed moment away from putting a leaking item in the wrong place.
Do not forget to train the problem solving path, because returns generates problems by nature. A clearly labeled “who to call” sign with radio channel or role names prevents wandering and keeps the flow moving.
Training also improves when you show the cost of mistakes in simple terms. When associates understand that a wrong restock can become a customer complaint, a chargeback, and a second return, they respect the signs more.
Auditing: catching misplaced items through signage checks
If you never audit the area, your signs slowly become background noise and people invent new shortcuts. A simple weekly signage walk catches problems before they show up as chargebacks, write offs, or customer complaints.
Auditing is also how you learn whether your visual system is actually doing its job. If you keep finding the same error in the same spot, the sign placement or wording is probably wrong, even if the SOP is right.
Start with the easiest metric, which is “items in the wrong color zone.”. If you find green tagged items in a recycle cage, you have a routing problem, not a worker problem.
Track that metric by shift and by day, because patterns show you where training is breaking down. If nights are worse than days, you may have lighting issues, missing signs, or a supervisor who is not reinforcing the system.
Check physical condition too, because a torn label or a faded rack sign is a process defect. Replace damaged returns area signage the same day, because the team will copy whatever looks official, even if it is wrong.
Also check for sign drift, where someone moves a rack but leaves the sign behind. A perfect sign in the wrong place is worse than no sign, because it trains people to make confident mistakes.
Audit the inspection station labels against the current SOP and the WMS menu options. If the system says “REFURB” but the wall says “REPAIR,” you are training people to mistrust one of them.
Do the same check for disposition codes on tote tags and printed labels, because those are part of the signage ecosystem. If the tote tag uses an old code, people will follow the tag instead of the wall sign.
Look for unofficial signs, because they are a symptom of unmet needs. If you see handwritten notes popping up, ask what problem they are solving, then replace them with a standard sign that matches your visual language.
Audit for visibility, not just correctness, because a sign hidden behind stacked totes is not a sign. If your area regularly blocks sight lines, you may need overhead signs or duplicate signs on multiple sides of the same zone.
Include safety and compliance in the audit, especially around quarantine and recycling. If PPE reminders are missing or unreadable, you are one incident away from a shutdown that will cost more than any sign ever will.
Finally, close the loop by posting audit results where the team can see them. When associates see that misplaced items dropped after a signage change, they start treating the visual system as a real tool instead of management theater.
Conclusion
Returns do not become efficient because people work harder, they become efficient because the space tells people what to do without debate. When wayfinding for returns and reverse logistics areas is clear, items move to the right process and stop clogging aisles.
Returns is a decision factory, and every unclear sign creates a pause, a question, or a wrong turn. If you want speed without chaos, you need the decisions to be visible, repeatable, and hard to ignore.
Invest in consistent returns area signage, standardized inspection station labels, and disposition zone signs that force a real choice at every handoff. If you keep the symbols tight and the colors honest, your reverse logistics area starts acting like a system instead of a pile.
The payoff shows up in smaller backlogs, cleaner inventory, and fewer painful surprises at cycle count. When the walls do the teaching and the zones do the thinking, good inventory stops dying in returns and starts flowing back into value.