Packaging labels fail for boring reasons, a missing symbol, a fuzzy barcode, or a file that prints with surprise color shifts. The fix usually starts earlier than people think, with custom label templates for packaging that are built for compliance and real press conditions.
I have seen teams argue about copy for days and then lose a week because the template had no bleed and the printer trimmed into the text. A disciplined template turns label work into repeatable production instead of a series of panicked rebuilds.
This article focuses on print-ready label design that holds up under regulatory checks and under a press operator who will not babysit your file. You will walk away with practical rules for packaging label compliance and the label file format choices that reduce reprints.
Why label templates matter for packaging compliance
Compliance is rarely about one big requirement, it is about many small requirements that must all be present and legible at the same time. A solid template makes those requirements hard to forget because the fields and symbol zones are already baked into the layout.
When you build custom label templates for packaging, you are really building a system for consistency across SKUs, sizes, and print vendors. That consistency matters when an auditor compares two lots and expects the same warnings, the same net contents location, and the same traceability fields.
Templates also protect you from last minute marketing changes that accidentally break packaging label compliance. If the safe zone, minimum type sizes, and barcode quiet zones are locked into the file, the design can flex without becoming noncompliant.
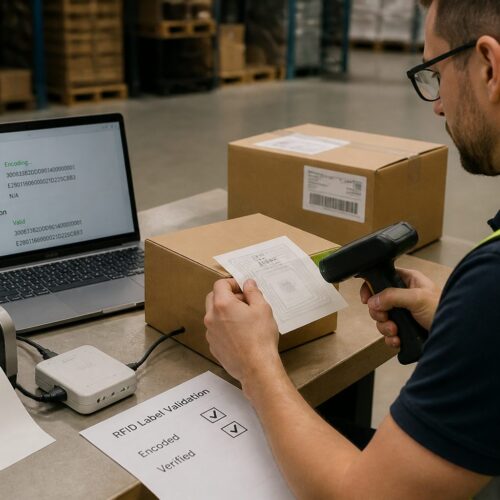
From a logistics standpoint, labels are machine read more often than they are human read. A template that enforces placement, contrast, and margins keeps scanners happy on a conveyor, in a cold room, or on a dusty dock.
A template also makes it easier to prove due diligence because you can show a repeatable process instead of a one time design. When a regulator asks how you ensure warnings are always present, a structured template is a better answer than “we try to remember.”

Even when the rules are clear, the risk is in the handoffs between teams. A template reduces interpretation because the compliance content is not just written down, it is physically placed and constrained.
It also helps when you have multiple printers, because each vendor will have slightly different tolerances and preferences. If your template already accounts for bleed, line weights, and barcode placement, you are less likely to get conflicting feedback.
Another quiet advantage is training, because new designers can follow the template instead of learning compliance by making mistakes. The template becomes a guardrail that keeps the work moving even when the team changes.
Templates are also where you can standardize legal disclaimers and required phrasing so they do not drift over time. If the approved wording lives in a locked layer, you avoid the “close enough” edits that create exposure.
When you are under time pressure, the template is what keeps you from trading correctness for speed. You can still move fast, but you are moving inside a structure that was built to survive review.
Understanding the required fields for your product type
Start by listing what must appear on the label for your category, then confirm it with the exact regulation or standard your business uses. Food, cosmetics, chemicals, and medical devices all have different mandatory fields, and the overlap can trick you into missing a category specific line.
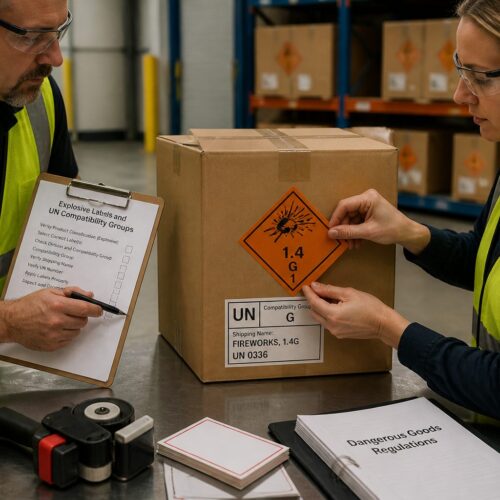
For consumer goods in the US, you will often need identity of commodity, net quantity of contents, and manufacturer or distributor information in a defined format. For hazardous materials, you may need GHS pictograms, signal words, hazard statements, precautionary statements, and supplier details.
For logistics labels, fields like GTIN, lot or batch, serial number, and date codes drive traceability and recall speed. If you ship internationally, you may also need country of origin, language requirements, and recycling or disposal marks tied to local rules.
Build your template around a data model, not around a single product. If your ERP exports GTIN-14 for cases and GTIN-12 for eaches, the template should anticipate both so your team does not resize barcodes by hand.
It helps to separate fields into “always required,” “required in specific markets,” and “required only for certain SKUs.” That way your template can include optional modules without turning every label into a crowded poster.
Be careful with claims, because the moment you say “organic,” “non toxic,” “recyclable,” or “made in,” you may trigger additional substantiation or formatting requirements. A template can reserve a claims area with rules about what proof is needed before the claim is allowed.
If your product is regulated, you may need to control not just the presence of text but the hierarchy and prominence. Some categories care about where warnings appear relative to the primary display panel, not just whether the words exist.
Units and measurement formatting are another trap because they look simple until you sell in multiple regions. Your template should support metric and imperial, decimal separators, and the exact abbreviations your legal team has approved.
Traceability fields deserve their own logic, because they often change per batch and are frequently applied with a secondary process like thermal transfer or inkjet. If you plan for that in the template, you can keep variable data out of the main art and avoid last minute edits.
Also decide what must be human readable versus what can be encoded only in a barcode or DataMatrix. A lot number that exists only in a code may be useless on a phone call during a recall, so the template should define both.
When you are unsure, treat ambiguity as a design requirement and not a future problem. Add a template note that cites the rule source so the next person does not “simplify” the label by deleting something critical.
Choosing the right file format for print-ready labels
The label file format you choose decides what your printer can control and what will break when the file leaves your computer. For print-ready label design, you want vector artwork for text and symbols, embedded or outlined fonts, and predictable color handling.
PDF/X is a dependable choice for many label workflows because it locks in trim, bleed, and color intent in a way presses and RIPs understand. AI or EPS can work too, but only if your vendor confirms their prepress flow and you package fonts and linked images correctly.
Think about the entire chain from your design software to the RIP to the press, because each step can interpret the file differently. A format that looks perfect on your screen can still break when transparency or overprints are processed in a different engine.
If you are working with a converter, ask whether they prefer a “live” file they can adjust or a locked final file they will not touch. Some shops want PDF/X only, while others want AI so they can trap, adjust bar widths, or add their own marks.
Versioning matters because a template is reused, and file formats handle links and fonts differently over time. If your AI file depends on linked images from a shared drive, you are one missing folder away from a silent substitution.
For variable data workflows, the “right format” may be two formats, a locked background PDF plus a separate variable layer generated by software. Your template should define which parts are fixed art and which parts are data driven.
Also consider how approvals happen, because marketing often reviews a PDF while production needs a press ready file. A good process exports an approval PDF and a print PDF with different settings, and the template should make that separation explicit.
When in doubt, request the printer’s specification sheet and build your export presets to match it. The goal is not to pick a “best” format in the abstract, it is to pick the format that your specific vendor can run without repairs.
| Label file format | Best use case | Common pitfalls |
|---|---|---|
| PDF/X-1a or PDF/X-4 | Final handoff to print vendors and converters | Wrong output intent, transparency flattening surprises, missing bleed settings |
| Adobe Illustrator (AI) | Master template editing and version control | Linked images not packaged, fonts missing, spot colors renamed |
| EPS | Legacy systems and simple vector marks | No live transparency, limited color management, embedded raster at low resolution |
| PNG or JPEG | Mockups and internal approvals only | Raster text, compression artifacts, poor barcode scan reliability |
| ZPL or EPL | Thermal printing on demand for logistics labels | Font substitution, scaling differences across printers, weak control of graphics |
Do not treat PNG or JPEG as “good enough” just because they are easy to email. Once your text is rasterized, you lose sharpness, you lose predictable scaling, and you lose the ability to verify bar widths accurately.
For thermal workflows, remember that ZPL and EPL are more like code than like design files. Your template still matters, but it becomes a specification for positions, fonts, and scaling that must be tested on the exact printer model.
If you are using PDF/X-4, confirm that your printer’s RIP handles live transparency the way you expect. Some shops still prefer PDF/X-1a because it forces flattening early, which can reduce surprises if done correctly.
Also decide whether you will outline fonts or embed them, because both choices have tradeoffs. Outlining reduces font errors but can make small text heavier, while embedding keeps text editable but depends on font licensing and proper packaging.
Setting up bleed, safe zone, and resolution in your template
Bleed is the extra printed area beyond the cut line, and labels without it look amateur fast. Most converters ask for 0.125 inch bleed, but you should confirm because some die cut shapes and small labels need more.
The safe zone is where your text and critical symbols must live so trimming and die drift do not clip them. I like at least 0.0625 inch inside the trim for larger labels, and more when the label is small or the substrate stretches.
Resolution rules depend on what is raster and what is vector. Keep logos, type, and regulatory symbols as vector whenever possible, and set raster images to 300 ppi at final size for standard print or higher for tiny labels.
Do not scale up low resolution art inside the template and hope the printer fixes it. If your product photo is 150 ppi at size, your label will look soft and the pressman will blame your file, because it is your file.
Bleed is not just for background color, it is also for any element that touches the edge, including patterns, gradients, and border rules. If a border sits exactly on the trim, it will look uneven on half the run because trimming is never perfectly centered.
Safe zones should account for application too, not just trimming. If a label is applied slightly off, a critical warning near the edge can end up wrapped around a corner or hidden under a seam.
Die lines should live on their own locked layer and be clearly labeled as non printing. If you leave a die line on a normal layer, someone will eventually export it into the final PDF and the printer will have to guess what you meant.
For complex shapes, ask for the die line from the converter and do not recreate it from a screenshot. A die that is off by even a millimeter can shift your safe zone enough to clip a symbol or a barcode quiet zone.
Line weights matter more than people expect, because thin rules can drop out on porous stocks or gain on flexo plates. Your template should set minimum stroke weights and avoid hairlines that only exist on screen.
If you use white text knocked out of a dark color, test it on the actual process because dot gain can fill in the counters. Sometimes the fix is as simple as increasing tracking or switching to a slightly heavier font weight.
When you are forced to use raster, use lossless or high quality sources and keep them in a consistent color space. Random RGB images pulled from the web are a reliable way to get muddy skin tones and unexpected grays on press.
Font and color rules that survive the printing process
Pick fonts that print cleanly at the smallest required size, then lock them in the template so nobody swaps in a thin display face. For compliance text, a sturdy sans serif with open counters usually wins, and it stays readable on textured stocks.
Minimum type size is not a style preference, it is a risk setting. If you have to print ingredients, warnings, or instructions, set a floor like 6 pt or 7 pt depending on the press and substrate, then test it on the actual material.
Color is where screens lie to you, especially for spot colors and metallics. Define brand colors as Pantone spots when required, define process builds when spots are not available, and keep a written spec inside your template notes.
Black text should usually be 100% K for small type to avoid registration issues, while large black panels may need rich black if your printer agrees. If you mix those carelessly, you can get halos, muddy edges, or weird shifts between lots.
Font licensing and availability are practical problems that can turn into production problems. If your printer cannot legally load your font, they may substitute it, and the new font can reflow your copy and break your safe zone.
Tracking and leading should be specified in the template, not left to individual taste. Tight leading that looks elegant on screen can plug up when printed on uncoated stock or when the press is running fast.
Color management should be decided up front, including whether you are working in CMYK only or mixing spot colors. If you treat every job as a new experiment, you will never get consistent results across SKUs.
Overprints should be intentional and documented, especially for black text and varnish layers. A template that labels the varnish and white ink layers clearly prevents accidental overprint settings that create invisible objects.
If you print on metallic or clear substrates, your color rules change because white ink becomes part of the design. Your template should include a dedicated white ink layer with clear naming so the printer knows what is a flood and what is a spot.
Gradients and subtle tints can band or shift depending on the process, especially on flexo with limited screening options. If your brand relies on smooth gradients, test them early and be ready to simplify them for stability.
Also remember that color is not just ink, it is ink plus substrate plus finish. A matte laminate can dull a bright color, and a glossy varnish can deepen it, so your template notes should mention the intended finish.
Placing barcodes and QR codes correctly in your layout
Barcodes are not decorations, they are measurement systems with strict geometry. Your template should reserve a barcode zone with a quiet zone, a flat background, and enough space to hit the right magnification for UPC, EAN, Code 128, or GS1 DataMatrix.
Do not distort a barcode to fit a box, because scanners read bars and spaces, not your intent. Generate barcodes from the correct data, keep them vector when possible, and confirm with your printer whether they prefer EPS, PDF, or native plugin output.
Placement should consider how the label will be used, not just how it looks in a mockup. A retail cashier, a warehouse picker, and an automated sorter all scan differently, and your template should reflect the most demanding case.
Keep barcodes away from edges where they can be clipped by trimming or damaged during application. Even a small nick in a quiet zone can drop scan rates, especially on high speed lines.
Avoid putting codes over seams, embossing, heavy textures, or strong curves, because the scanner needs consistent reflectance. If the package shape forces a curve, consider moving the code to a flatter panel or using a different symbology that tolerates it better.
QR codes and DataMatrix codes are robust, but they are not magic. If you make them too small, print them with dot gain, or cover them with a high gloss varnish that causes glare, they will still fail in the real world.
Human readable text should be treated as a backup system, not an afterthought. Your template should reserve space for it so it does not end up squeezed into a corner at 5 pt.
- Reserve quiet zone space on all sides
- Keep codes off seams, folds, and curved corners
- Use solid light backgrounds, avoid patterns and varnish breaks
- Match symbology to use case, UPC for retail, GS1-128 for logistics
- Verify size and magnification against GS1 specs
- Plan human readable text placement below or beside the code
If you are using GS1 standards, treat the specification as part of the template, not a separate document nobody reads. Include magnification targets, bearer bar guidance if relevant, and a note about acceptable barcode grades.
Also plan for print gain, because bars can thicken on certain stocks and inks. A barcode that is technically correct in the file can become marginal on press if you are running heavy ink coverage or a soft plate.
If you rely on variable barcodes, test the longest and shortest data strings, because they can change symbol size. Your template should anticipate the maximum length so the code does not overflow into other content when a long lot number appears.
Finally, do not let marketing place a badge or callout too close to the code because it “balances the layout.” The template should enforce a no fly zone so the barcode remains a functional tool, not a design casualty.
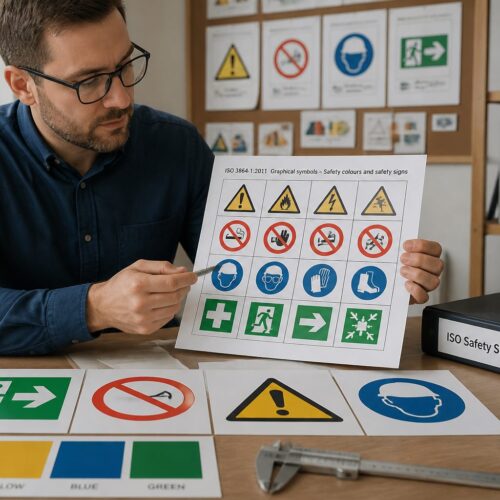
Adding regulatory marks and symbols without visual clutter
Regulatory marks pile up quickly, recycling marks, WEEE, CE, UKCA, FSC, GHS pictograms, handling icons, and battery symbols can all land on the same label. A template helps by creating a dedicated compliance panel where marks live in a controlled grid.
Use official artwork from the issuing body or a reputable standards library, and never redraw a mark by eye. Small geometry errors can make a symbol noncompliant, and a sloppy CE mark is an easy target for an inspector.
Group symbols by function so the label reads like a system, safety symbols together, environmental marks together, then logistics marks. When everything floats randomly, operators miss the one symbol they actually need during receiving or storage.
Whitespace is a compliance tool, not wasted space. If you cannot fit required marks cleanly, consider a fold out label, a two panel label, or moving marketing copy off the primary display panel.
Size rules matter for marks, and they are not always obvious. Some symbols have minimum dimensions or line weights, and a template can enforce those so nobody shrinks them to make room for a tagline.
Contrast is part of legibility, especially for pictograms and handling icons. If you place a black icon over a dark brand color, you may technically include the symbol while functionally hiding it.
Be careful with multilingual requirements because they multiply clutter fast. A template can define a consistent pattern, like English first, then secondary language, with fixed spacing and a maximum line count before you move content to a secondary panel.
Some marks require accompanying text, registration numbers, or specific spacing rules. If that applies to your category, build the text into the symbol module so it travels with the mark and stays consistent.
Do not assume a symbol is universal just because it is common in your market. If you sell internationally, confirm whether a mark is recognized, restricted, or replaced by a different local requirement.
Also think about finishes, because embossing, spot varnish, and metallic foils can interfere with symbol clarity. A compliance panel is often the place where you keep finishes simple so the marks remain readable.
If you need to add a new symbol later, a grid based panel makes that change predictable. You can add a new cell and update the legend without redesigning the entire label.
Testing your template before full production runs
A template is not proven until it prints on the real substrate with the real process, flexo, digital, offset, or thermal. Ask for a press proof or at least a contract proof, then compare it to your color targets and legibility requirements under normal lighting.
Scan testing should be part of the approval, because a barcode that looks fine can still fail at speed. Use a verifier if you can, or at minimum test with the same scanners used in your warehouse and at your retail partner.
Test worst case conditions on purpose, cold rooms, condensation, abrasion, and low contrast lighting expose weak decisions fast. If the label is for chemicals or outdoor storage, verify that inks, adhesives, and overlaminates match the durability spec.
Keep a short checklist attached to the template file so every revision gets the same review. That checklist should cover packaging label compliance items, barcode grade targets, and the label file format export settings your printer expects.
Proofreading should be treated like a production step, not a casual glance, because one wrong digit can break traceability. A template can include a proofing layer that highlights variable fields so reviewers know where errors typically hide.
Check dielines and orientation on a physical mockup, because a label that looks correct flat can be wrong when wrapped. A quick print on paper and a wrap test can reveal that the front panel is shifted or that a seam lands on a barcode.
Adhesive and material testing is part of label success, even though it feels separate from design. If the label lifts at the edge or wrinkles on application, your perfect template still fails in the field.
When you review color, do it under the lighting conditions where the product is sold or used. A label that looks fine under a D50 light booth can look dull under warm retail lighting or harsh under warehouse LEDs.
Also test how the label behaves after handling, because scuffing can destroy fine type and thin rules. If your product is shipped in bulk cartons, abrasion resistance matters as much as aesthetics.
If you use a varnish or laminate, confirm it does not interfere with scanning or legibility. Gloss can create glare on QR codes, and heavy texture can break up small type.
Document what you learn in the template itself, not in someone’s memory. A note like “do not reduce warning text below 7 pt on uncoated stock” saves you from repeating the same test six months later.
Common template mistakes that cause reprints
The most expensive mistake is building a beautiful layout that ignores manufacturing reality. If your label wraps around a curved bottle, text near the edge may distort, and a barcode near the curve may stop scanning.
Another common failure is mixing spot and process colors without a plan, especially when a design moves between digital and flexo. You end up with a brand color that drifts, and the next run looks like a different product line.
People also forget that overprint settings can change everything, and a white object set to overprint disappears on press. Your template should include a preflight step that checks overprint, knockout, and transparency behavior before export.
Finally, teams lose time when they treat the template like a one off file instead of a controlled master. Put version numbers in the file name, lock layers for compliance zones, and document where variable data comes from so nobody pastes in a random spreadsheet value.
Missing bleed is obvious, but inconsistent bleed is sneakier and just as costly. If one side has bleed and another side does not, the cutter will expose unprinted edges and the run will look defective.
Another repeat offender is putting critical content too close to the die line because the mockup “looked centered.” The template should define safe zones that are based on print tolerances, not on what looks balanced on screen.
Using raster logos is a quiet way to make a label look cheap, especially when the logo is small and needs crisp edges. A template should include approved vector logos and prevent random downloads from being used.
Designers also forget to expand strokes or effects when required by the printer’s workflow. If a stroke is too thin and gets rounded or dropped during processing, you can lose key separators and boxes.
Barcode mistakes often come from resizing and rotating without understanding the consequences. A template should specify orientation rules and prohibit arbitrary scaling so the code stays within spec.
Another issue is leaving unused spot colors in the file, which can trigger extra plates or confuse prepress. A clean template has a controlled swatch list and a habit of deleting anything not in use.
Copy and legal text can drift when people paste from emails and documents with hidden formatting. A template that uses paragraph styles and locked text frames reduces the chance of accidental font changes and line breaks.
Finally, teams forget to align the template to how the job is quoted and manufactured, like the number of colors, the presence of white ink, or the need for a varnish plate. If the template does not match the production plan, you will pay for changes in prepress or on press.
Conclusion
Custom label templates for packaging work best when they force good habits, correct fields, correct geometry, and correct export settings every time. When you treat the template as production tooling, print-ready label design becomes predictable and packaging label compliance stops feeling like a fire drill.
Pick a label file format your printer can run without manual repair, then bake bleed, safe zones, barcode rules, and symbol panels into the master. Your future self will thank you the first time a new SKU ships without a last minute redesign.
The point is not to make design rigid, it is to make production reliable. A strong template gives you room to be creative where it is safe and forces discipline where mistakes are expensive.
If you only do one thing, build a master file that reflects real tolerances and real requirements, then protect it like you would any other production asset. Every hour you spend tightening the template saves multiple hours of rework when the stakes are higher.